How to Make a Stunning Drip Cake at Home
If you have ever admired those gorgeous cakes that look like they are dripping with glossy, luscious chocolate or colorful ganache, you are in the right place. Learning how to make a stunning drip cake at home is simpler than it seems, and it’s a fantastic way to impress your friends and family with a bakery-quality dessert. Whether you love rich chocolatiness, fruity freshness, or a classic vanilla vibe, this guide will walk you through every detail to create a beautiful, delicious drip cake perfect for any celebration or cozy gathering.
Why You’ll Love This Recipe
- Visual Wow Factor: The glossy drip effect instantly turns any simple cake into a showstopper.
- Customizable Flavors: Easily adjust the cake and drip flavors to suit your personal tastes or dietary needs.
- Beginner Friendly: Simple steps and common ingredients mean you don’t need to be a pro to succeed.
- Perfect for Any Occasion: Whether it’s a birthday, anniversary, or just because, this cake is always a hit.
- Fun to Make: Watching the drip cascade down the edges is satisfying and creative.
Ingredients You’ll Need
The magic of a stunning drip cake starts with simple, quality ingredients. Each one plays a role in creating the perfect texture, moist crumb, and that shiny drip that everyone loves.
- Flour: Provides the structure and base for your cake layers.
- Sugar: Balances flavors and tenderizes the crumb.
- Baking powder: Leavens the cake to achieve a light, airy texture.
- Plant-based milk: Keeps the batter moist without overpowering flavors.
- Unsweetened cocoa powder or vanilla extract: Adds your chosen flavor focus to the cake.
- Vegetable oil or softened plant-based butter: Creates moistness and richness.
- Powdered sugar: Essential for smooth, silky frosting.
- Shredded mozzarella cheese (vegetal): Optionally adds creaminess in fillings or frosting enhancements.
- Dark chocolate or candy melts: The backbone for that iconic drip effect.
- Heavy plant-based cream or coconut cream: Helps create a shiny, luscious ganache drip.
- Food coloring (optional): Customizes your drip colors for themed cakes.
Variations for Drip Cake
One of the best parts about making a drip cake is how easily you can change it up based on what you like or what you have on hand. Don’t hesitate to experiment and make it your own!
- Fruit Infusions: Add raspberry puree or lemon zest to your ganache for a fresh twist.
- Vegan Adaptations: Use plant-based butter and milks to keep it fully vegan without sacrificing taste.
- Nutty Touch: Incorporate finely chopped nuts or nut butters into the frosting for added texture.
- Color Play: Blend in vibrant food colors for rainbows or themed occasions.
- Flavored Layers: Swap vanilla for coconut, almond, or coffee cake layers for a unique surprise.

How to Make Drip Cake
Step 1: Prepare the Cake Layers
Start by preheating your oven and greasing your cake pans. Mix your dry ingredients—flour, sugar, baking powder—with the wet stuff like plant-based milk, oil, and extracts in a bowl. Pour evenly into your pans and bake until a toothpick inserted comes out clean. Let them cool completely to avoid melting your frosting.
Step 2: Make the Frosting
Create a smooth, creamy frosting by beating softened plant-based butter or vegetable oil with powdered sugar. Add small amounts of plant-based milk for consistency. Spread it generously over your cake layers, stacking them carefully to form an even tower.
Step 3: Chill the Cake
Pop the frosted cake into the fridge for at least 30 minutes. This makes the frosting firm and prevents the drip from running too far down when applied.
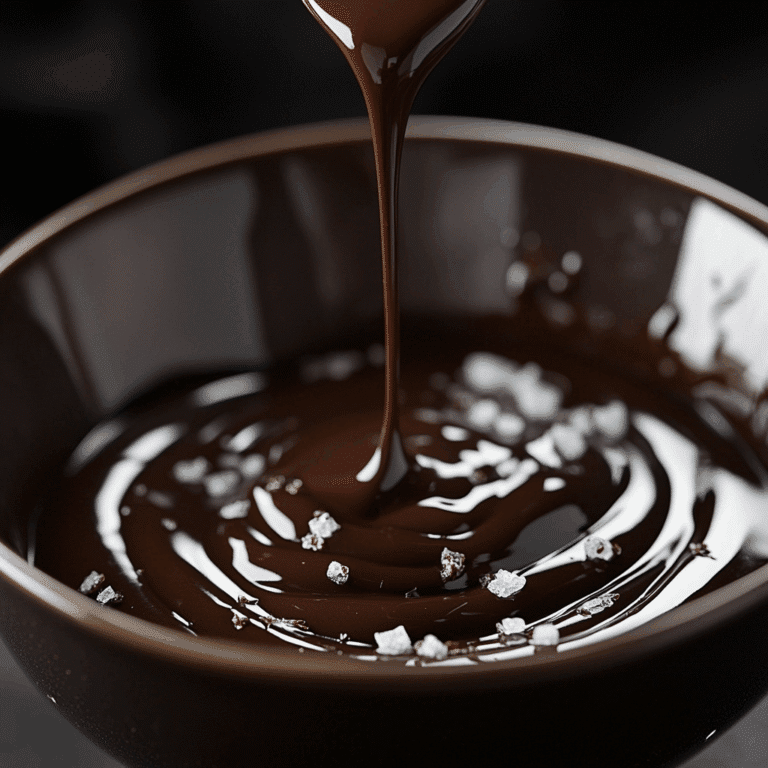
Step 4: Prepare the Ganache Drip
Heat your plant-based cream gently and pour it over chopped dark chocolate or candy melts. Stir until smooth and glossy. If you want to add color, mix in food coloring now. Let it cool slightly but not so much that it thickens too much to pour.
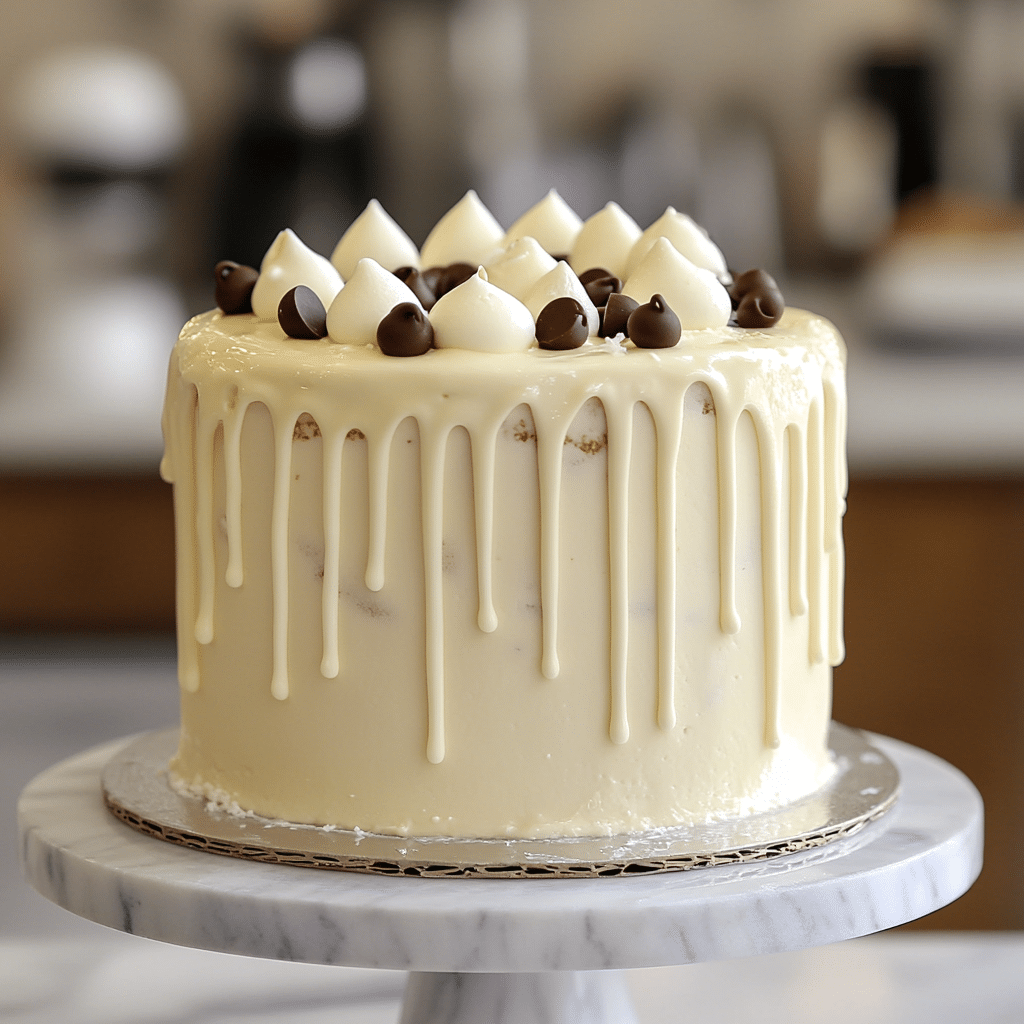
Step 5: Apply the Drip
Using a spoon or squeeze bottle, slowly add the ganache around the edges of the cake so that it drips down naturally. You can control the length of the drips by adjusting how much ganache you apply. Then pour the remaining ganache over the top and spread gently.
Step 6: Decorate and Finish
Add any extra decorations like sprinkles, fresh fruit, or edible flowers on top while the drip is still tacky. Chill again briefly to set everything before serving.
Pro Tips for Making Drip Cake
- Chill Properly: Make sure your cake and frosting are well chilled before adding the drip to control runniness.
- Test Your Drip: Try dripping the ganache on the side of a bowl before applying it to the cake.
- Use a Squeeze Bottle: For precise drip placement and length control, a squeeze bottle works wonders.
- Room Temperature Ganache: Ensure your ganache is slightly warm but not hot to avoid melting your frosting.
- Work Quickly: Once the drip starts setting, add your decorations fast for better adhesion.
How to Serve Drip Cake
Garnishes
Fresh berries, edible flowers, chopped nuts, or themed candies make beautiful garnishes that add texture, burst of flavor, and an extra wow factor to your drip cake presentation.
Side Dishes
Serve your drip cake with light accompaniments like fresh fruit salad, a scoop of dairy-free ice cream, or a simple cup of herbal tea to balance richness.
Creative Ways to Present
Place your drip cake on a decorated cake stand to elevate its presence, surround with matching mini cupcakes using the same colors, or create a dessert table featuring complementary treats for a stunning display.
Make Ahead and Storage
Storing Leftovers
Keep your drip cake covered in an airtight container in the fridge for up to 3 days to maintain freshness and moisture.
Freezing
You can freeze drip cake slices wrapped tightly in plastic wrap and foil for up to a month. Thaw overnight in the fridge before serving.
Reheating
Let the cake come to room temperature before eating to fully enjoy the flavors and textures. Avoid microwaving as it can affect the drip and frosting consistency.
FAQs
Can I use different types of chocolate for the drip?
Absolutely! Dark, semi-sweet, or even white chocolate candy melts all work well for the drip, depending on your flavor preferences.
Do I need special tools to make a drip cake?
No special tools are necessary, but a squeeze bottle or spoon makes controlling the drip easier and more precise.
How can I fix drips that run too far down?
Ensure your cake is well chilled and your ganache is not too runny; chilling longer or letting the ganache thicken can help control the drip length.
Can I make this cake dairy-free?
Yes, using plant-based milk, butter substitutes, and vegan-friendly chocolate will keep the cake fully dairy-free without sacrificing taste.
How should I transport a drip cake?
Use a sturdy cake box and keep it as cool as possible to prevent melting, especially if the ganache drip is at room temperature.
Final Thoughts
Making a stunning drip cake at home is one of those joyful kitchen adventures that transforms simple ingredients into a breathtaking centerpiece. With just a few steps and some fun creativity, you can share a beautiful, delicious dessert that truly feels special. So grab your ingredients, roll up your sleeves, and get ready to wow everyone with your very own drip cake masterpiece!