How to Make Delicious Mummy Cookies Fast
If you’re looking to whip up a spooky, sweet treat that’s both fun and fast, learning how to make delicious Mummy Cookies fast is the perfect recipe to try. These delightfully creepy yet charming cookies combine simple ingredients with easy decorating tricks to deliver a quick Halloween treat that everyone will love. Whether you’re baking for a party, school event, or just some seasonal fun at home, making Mummy Cookies is a fantastic way to dive into festive baking without spending hours in the kitchen.
Why You’ll Love This Recipe
- Speedy preparation: This recipe comes together quickly, perfect for last-minute baking adventures.
- Simple ingredients: Uses common pantry staples, making it accessible for anyone to bake.
- Kid-friendly decorating: Fun, easy decorating steps that kids and adults will enjoy.
- Delicious taste: A soft, chewy cookie with just the right sweetness to satisfy cravings.
- Perfect for Halloween: Spooky and charming design ideal for parties and themed gatherings.
Ingredients You’ll Need
To make Mummy Cookies that taste as good as they look, you’ll want to gather a handful of straightforward ingredients. Each one plays a role in creating the perfect textured cookie base or enhancing the creepy mummy design with tasty accents.
- Butter: Adds richness and moisture for that melt-in-your-mouth texture.
- Sugar: A mix of granulated and brown sugar to balance sweetness and softness.
- Eggs: Bind ingredients together and provide structure.
- Vanilla extract: Gives a warm, inviting aroma and flavor.
- Flour: The foundation for the cookie dough’s shape and bite.
- Baking soda: Helps the cookies rise just right, keeping them tender.
- Salt: Enhances flavor by balancing sweetness.
- White chocolate chips or icing: Perfect for creating the mummy’s bandage effect.
- Mini chocolate chips or candy eyes: Essential for giving your mummy cookies their spooky, expressive eyes.
Variations for Mummy Cookies
Feel free to get creative with Mummy Cookies by customizing the recipe to suit dietary needs, taste preferences, or just to put your own spin on this classic treat. It’s super easy to tailor the look and flavor to delight your guests.
- Gluten-free option: Substitute all-purpose flour with a gluten-free blend for a delicious alternative.
- Vegan twist: Use plant-based butter and flax eggs in place of dairy and regular eggs.
- Spice it up: Add a pinch of cinnamon or pumpkin spice to the dough for a seasonal flair.
- Peanut butter mummy: Swap half the butter for peanut butter to add nutty flavor and extra softness.
- Decorating switch-up: Use colored candy melts or tinted icing for brightly hued mummy bandages.

How to Make Mummy Cookies
Step 1: Prepare the Dough
Begin by beating softened butter together with granulated and brown sugar until the mixture is light and creamy. Add eggs and vanilla extract, beating until fully combined. In a separate bowl, whisk together flour, baking soda, and salt, then slowly incorporate the dry ingredients into the wet, mixing until a smooth dough forms.
Step 2: Shape the Cookies
Using a spoon or your hands, scoop out small portions of dough and roll them into oval or round shapes for each mummy body. Place them on a baking sheet lined with parchment paper, spacing them evenly to avoid merging while baking.
Step 3: Bake until Golden
Pop the baking sheet into a preheated oven set to 350°F (175°C) and bake for 8-10 minutes. The edges should be lightly golden while the center remains soft. Remove the cookies and let them cool completely on a wire rack before decorating.
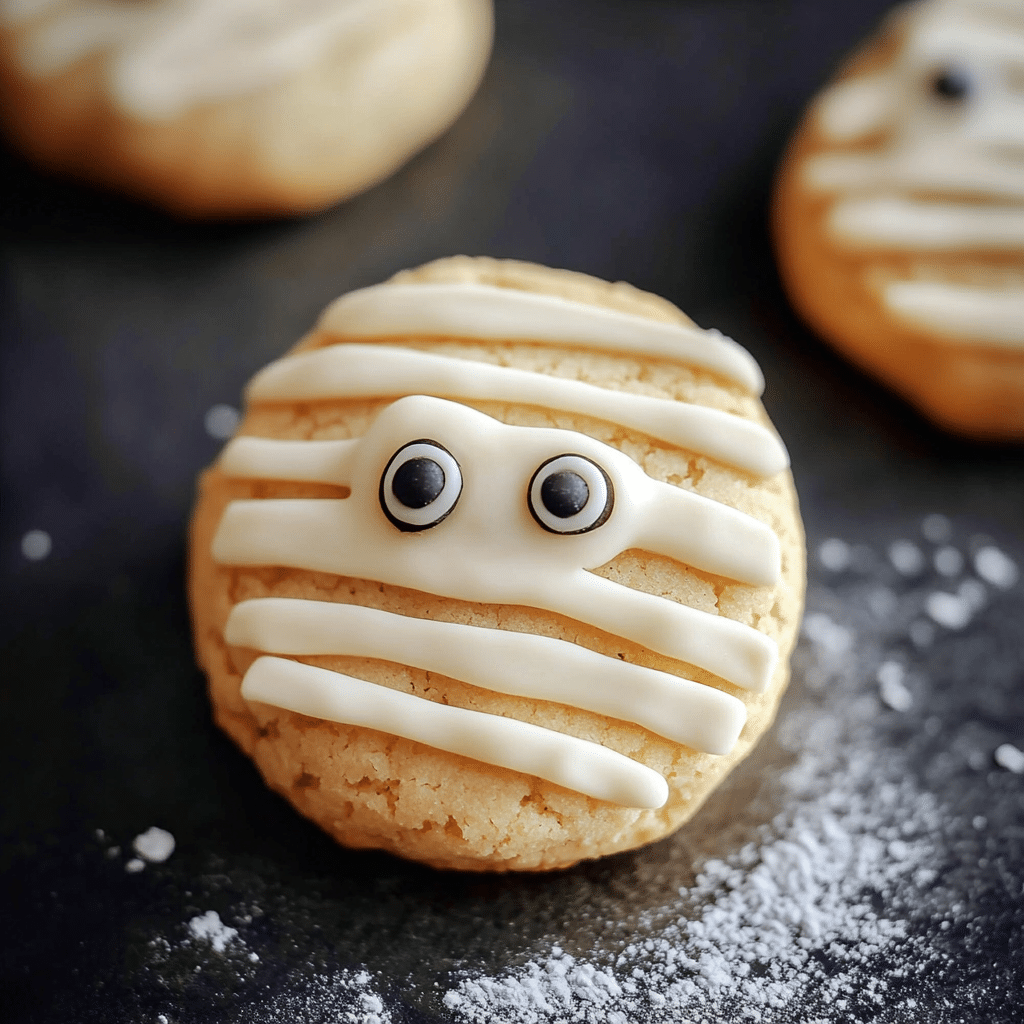
Step 4: Decorate the Mummy Bandages
Using melted white chocolate or white icing, pipe thin, crisscrossing lines across the cookies to mimic mummy bandages. Make sure to leave small gaps to peek at the cookie beneath, giving an authentic wrapped look.
Step 5: Add the Eyes
Place two mini chocolate chips or candy eyes near the top of each cookie on the white chocolate or icing bandages. Press gently so they stick securely. Let the bandages set fully before serving or storing.
Pro Tips for Making Mummy Cookies
- Chill the dough: Refrigerate the dough for 15-20 minutes if it feels too soft to handle easily.
- Use piping bags: For neat and precise mummy bandages, pipe the icing or chocolate through a small-tipped bag.
- Watch baking time: Avoid overbaking to keep cookies soft and chewy instead of crunchy.
- Eye placement: Position candy eyes while icing is still wet to ensure they stick well.
- Make ahead: Dough can be made in advance and refrigerated for up to 24 hours to save time.
How to Serve Mummy Cookies
Garnishes
Sprinkle a tiny pinch of edible glitter or dust with cocoa powder to add a magical or shadowy effect, enhancing the spooky vibe.
Side Dishes
Serve your Mummy Cookies alongside warm pumpkin spice latte, hot chocolate, or spiced apple cider for a cozy seasonal pairing.
Creative Ways to Present
Arrange the cookies on a platter shaped like a coffin or surrounded by faux spider webs and mini pumpkins for an eye-catching festive display.
Make Ahead and Storage
Storing Leftovers
Keep your Mummy Cookies fresh by storing them in an airtight container at room temperature for up to 4 days, ensuring they stay soft and delicious.
Freezing
You can freeze baked and decorated Mummy Cookies by placing them between parchment sheets in a container or freezer bag for up to 2 months; thaw them at room temperature before serving.
Reheating
Warm your cookies lightly in the microwave for 10-15 seconds to revive their soft, freshly-baked texture without melting the decorations.
FAQs
Can I use store-bought dough for Mummy Cookies?
Absolutely! Store-bought sugar cookie dough works great and cuts down preparation time even more, just be sure to add the mummy decoration steps.
What if I don’t have candy eyes?
You can substitute with mini chocolate chips or pipe small dots of black icing for eyes—it still looks adorable.
Can these cookies be made gluten-free?
Yes, switching to a gluten-free flour blend will give you tasty Mummy Cookies that everyone can enjoy safely.
How long do Mummy Cookies last?
Properly stored in an airtight container, they stay fresh for about 4 days, but they’re best eaten sooner for optimal softness.
Can I make Mummy Cookies without white chocolate?
Definitely! White icing, royal icing, or any white candy melts will work perfectly for creating the mummy wrap effect.
Final Thoughts
Trying your hand at making Mummy Cookies is a fun and rewarding way to bring some festive cheer to your kitchen in no time. These quick, easy, and irresistibly cute treats will have everyone reaching for seconds, so don’t be shy—bake a batch today and enjoy the sweet spooky magic!